Setting Up your own file sharing service
Posted by tech master | at 12:46 PM
This tutorial will let you setup a 0$ file sharing server. Before on to this we need
1. Gmail Drive Extension (for upload)– This tool will virtually setup a drive that can be accessed from my computer and transfer files between computer & gmail account as attachments. We wont be using this utility to download files although its required to be installed to upload our files.
2. Gmail php script (for download)- this script sets up a web interface to allow anyone to download the files that we uploaded to our gmail account.
Now lets start
Install the extension first from here
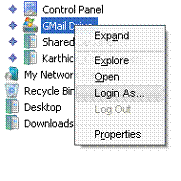
Login on to your gmail account from explorer

We will be able to see all our files and folders as drive contents, copy & paste desired files/folders

Now that we had uploaded the files…it’s the time for us to share the stuffs we uploaded for outside.For the second phase of our setup, we need a site with support for php & curl extension. I recommend using oxyhostsfree.com again its up to personal preference.
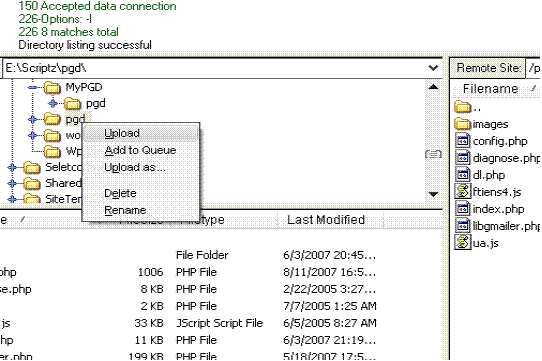
Download the script ftp the contents that we just now extracted
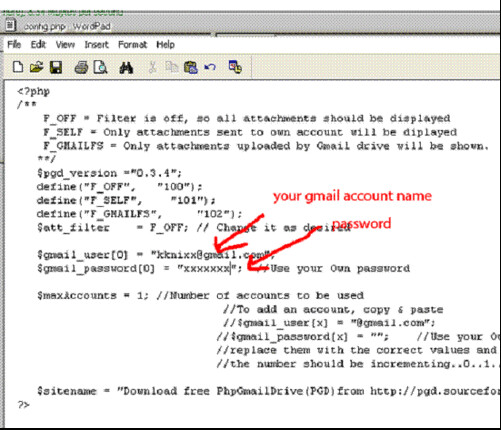
open up config.php
Enter gmail id and password. We can also enter multiple ids & passwords if we wish to have our server to be more than 3 gb.
Upload the file and we are done.
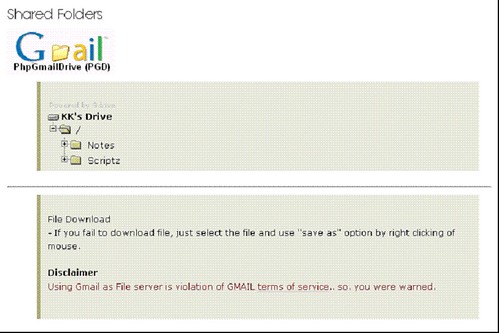
open up the url and we will be able to see our files listed as tree format.
Pros:
-Gmail’s speed and reliability that means files are safe and remains undeleted
-Virtually unlimited….we can setup as many account to multiple the storage
-Upload any file format
Cons:
-20 MB file size limit-Be aware of gmail terms of service
What can be this used for?
-Document archive: Upload documents and research work
- Doc-blog. Daily notes uploaded as Doc files are kept there.
- MP3 Files share: MP3 musics could be uploaded there.
- Picture hosting: You can share your pictures.
1. Gmail Drive Extension (for upload)– This tool will virtually setup a drive that can be accessed from my computer and transfer files between computer & gmail account as attachments. We wont be using this utility to download files although its required to be installed to upload our files.
2. Gmail php script (for download)- this script sets up a web interface to allow anyone to download the files that we uploaded to our gmail account.
Now lets start
Install the extension first from here
Login on to your gmail account from explorer
We will be able to see all our files and folders as drive contents, copy & paste desired files/folders
Now that we had uploaded the files…it’s the time for us to share the stuffs we uploaded for outside.For the second phase of our setup, we need a site with support for php & curl extension. I recommend using oxyhostsfree.com again its up to personal preference.
Download the script ftp the contents that we just now extracted
open up config.php
Enter gmail id and password. We can also enter multiple ids & passwords if we wish to have our server to be more than 3 gb.
Upload the file and we are done.
open up the url and we will be able to see our files listed as tree format.
Pros:
-Gmail’s speed and reliability that means files are safe and remains undeleted
-Virtually unlimited….we can setup as many account to multiple the storage
-Upload any file format
Cons:
-20 MB file size limit-Be aware of gmail terms of service
What can be this used for?
-Document archive: Upload documents and research work
- Doc-blog. Daily notes uploaded as Doc files are kept there.
- MP3 Files share: MP3 musics could be uploaded there.
- Picture hosting: You can share your pictures.


5 comments: