Disable The Booting Logo in Windows XP

Posted by tech master  |  at  9:54 AM

WindowsXP Booting Screenshot One can remove the boot logo that appears when you start Windows XP. This little
tweak saves a few seconds of your boot time, but seconds count if you are serious about trying to get Windows XP up and running as quickly as possible. The only negative is that if you remove the boot logo, you will also not see any boot messages, such as check disk.

To remove the boot logo, follow these steps:
1. Select Start-->Run, type msconfig, and click OK.
2. In the System Configuration Utility, click the BOOT.INI tab.
3. On the BOOT.INI tab, click the NOGUIBOOT check box option. Click OK.
4. Restart your computer to check the results.

11 comments:

Converting a Black & White Picture to Color

Posted by tech master  |  at  2:14 PM

Photoshop Knowledge required: Medium
External Plug-ins required: None
(Before starting reset your workspace by Window ---> Workspace ---> Reset Palette Locations)


This could be an interesting tutorial.
Using this you can color almost any Black & White image.
Actually there are two ways to color an image. You have to use them according to your needs.
The methods are sorted with simplicity.


I method: Simplest


Adobe Photoshop has a great blending mode called the color mode.
It can give fantastic effects!

Step 1: Select the color you want to do to a specific part of image
Step 2: Select "Brush Tool" {Size: Choose according to your needs --- Mode: "Overlay" or "Color" --- Opacity: 100 --- Flow: 100}
Step 3: Go nuts! Just paint the area of the picture you want to color

Pros: Easiest coloring possible, well for newbie’s who don't want the resultant image to be too realistic.
Cons: Very time consuming, provides pretty cheap results, you can't adjust the colors because you'll have to paint again...


II method: Hardest


Remember that in this method you'll have to work with objects that are in the front and then go to the objects in the background.
Here I'm taking a picture that comes with Adobe Photoshop as a sample.
You can find it in [Drive]:\Program Files\Adobe\Photoshop CS\Samples\RanchHouse.jpg


Step 1: Change the image to color mode by Image ---> Mode ---> RGB Color (!!!IMPORTANT!!! Always check this)
Step 2: Zoom to about 200%
Step 3: Select the magnetic lasso tool {Feather: 1px --- Anti-aliased: Yes --- Width: 10px --- Edge Contrast: 10% --- Frequency: 100}
Step 4: Now click on the edge of any object Coat, Boot, Hat, Door etc... (Not the wall or the floor)
Step 5: Just move your mouse cursor around the edges of the object until you have a complete selection. Like this
{Tip: If your magnetic lasso tool doesn't go where you want it to, you can just click the points manually. To remove the last point just press backspace. Refer to Photoshop manual for more assistance}


Step 6: Press Ctrl+J to do "Layer via Copy"
Step 7: Go to Image --> Adjustments --> Hue/Saturation {Colorize: Yes}

Step 8: Now adjust the Hue/Saturation and Lightness until your object looks realistic.
{Tip: The realism of the resulting image depends on the experimenting you have done. And the amount of efforts put to small objects. Always remember to experiment with the "Brightness/Contrast option to make your objects looks better}

Step 9: Set the blending mode of the layer to "Color". You can experiment with others too...

Step 10: Do the same for every other object. (Remember to click on the Background layer first)
{Tip: Using "Magnetic Lasso" tool won't always do the work ... It is difficult to select the images using this tool...
So after using this tool... select the "Rectangular Marquee" tool and select the "Add to selection button" (Hold your mouse over the buttons to make the text appear" and then draw at the edges}

t

Step 11: To color the background (Ground, Wall) you need not worry about the selection too much because you have already colored the objects and put them over the top of the background...
So Click on the Background layer and just select the wall including the objects and directly apply "Hue/Saturation" to it...

Step 12: Layer ---> Flatten Image
Step 13: Image ---> Adjustments ---> Auto Levels & Auto Contrast & Auto Color


This should make you able to color most of the B&W images to color...
If you have any problems, feel free to comment here

0 comments:

Nine-year-old writes iPhone code

Posted by tech master  |  at  4:44 AM

A nine-year-old Malaysian boy in Singapore has written a painting application for the Apple iPhone.

Lim Ding Wen created the finger painting program, known as Doodle Kids, for his two younger sisters aged three and five.

The program allows iPhone owners to draw images on the handset's touch screen using just their fingers.

The program has been downloaded more than 4,000 times from Apple's iTunes store in less than two weeks.

While most children of his age are painting or drawing with crayons, Lim Ding Wen has been programming.

Lim, who is now fluent in six programming languages, first started using a computer when he was two-years-old, discovered programming aged seven, and has since completed more than 20 programming projects.

His latest application, Doodle Kids, allows users to draw pictures using their fingers and then clear the screen by shaking the iPhone.

"I wrote the program for my younger sisters, who like to draw," said Lim. "But I am happy that people like it."

Lim wrote the original application on his computer but has now adapted it for use on an iPhone.

He told The Electric New Paper in Singapore that he wrote the application in just a few days in Pascal.

2 comments:

Codemaster's game FUEL makes a world record.

Posted by tech master  |  at  4:39 AM


5,560 square miles: the largest playable environment in a console game recognised by Guinness World Records™


Friday 22nd May (10am UK TIME)– It covers the approximate area of Trinidad & Tobago, it’s larger than Hong Kong, Singapore, St Lucia and the Isle of Man put together. Innovative open-world racer FUEL™ – launching on June 5th (localise per territory) for the PLAYSTATION®3 computer entertainment system, Xbox 360® video game and entertainment system from Microsoft® and a Games For Windows® edition to follow - boasts 5,560 square miles of accessible in-game terrain, making it officially the largest playable environment in a console game ever.

Asobo Team, developers of FUEL

The accolade, presented to FUEL developers Asobo Studio, was confirmed by Guinness World Records, who have verified the record for inclusion in the next Guinness World Records Gamers Edition of the best-selling guide.

Guinness World Records presented Codemasters and Asobo Studio with a certificate that officially documents:
“Largest playable area in a console game: The largest playable environment in a console game is 5,560 sq mi (14,400 km²), and is featured in FUEL (Codemasters, 2009). The area features rivers, deserts, forests and mountains and was demonstrated at the offices of Guinness World Records, London, UK, on 20 May 2009.”

“We’ve been very impressed with the technology powering FUEL, and I’m pleased to welcome Asobo and Codemasters into the Guinness World Records Gamer's Edition,” said Gaz Deaves, Video Games Records Manager for Guinness World Records, “What we’ve seen from FUEL places it right at the cutting edge of the open-world racing genre and really raises the bar for games developers in the future.”

“We knew FUEL was going to be big,” said Phil Wright, Producer, Codemasters, “but to have this confirmed officially by Guinness World Records justifies our faith in this ground-breaking title. No other game comes close to offering the variety of environments, the range of vehicles or the sheer size of FUEL. It’s one of the most innovative racers ever, and we’re thrilled it’s been recognised as the biggest console game of all time.”

FUEL, from Codemasters

To celebrate the award, today Codemasters has released a new video featuring David Dedeine and Sebastian Wloch, two of the co-founders of Asobo Studio, who explain gameplay features and the technical challenge in creating the record-setting FUEL. The video is available from www.fuel-game.com (in the Downloads section).

FUEL’s world is one of staggering size and beauty. To put it into perspective, if players choose to drive from one side of the map to the other, it will take over 3 hours straight. This unprecedented virtual playground offers 19 environmental regions and features some of the most dramatic weather effects ever seen in a racing game. FUEL’s free-roaming nature allows players to pick and choose their route, races and career progression, offering almost limitless ways to play.

FUEL is set to become the ultimate racing sandbox when it launches Friday June 5th for the PLAYSTATION®3 computer entertainment system and Xbox 360® video game and entertainment system from Microsoft® with a Games For Windows® LIVE edition to follow. Gain an insight into the creation of the game that sets the new standard in open-world racing by downloading the video at www.fuel-game.com.

More screenshots are available on the Codemasters Official Flickr Channel.

0 comments:

View all video files as thumbnails

Posted by tech master  |  at  11:04 AM

Registry Tweak(A simple tweak)

While in thumbnails view in explorer of Win XP, we can see video's starting frame but only for some of the predefined video file's extensions like mpg, mpeg, avi but not for extensions like rmvb(Real media files) and 3gp & 3g2(Mobile video files)
Here we will just copy the settings of one extension to another through registry editor and we will be able to view their first frame in thumbnail just like as we are able with pre-defined files.
Note: Registry should be handled with care, I would recommend taking a backup before you do any changes in the registry. I don't take responsibility of any damage or loss incurred by users while implementing this tweak.
Steps For Doing It:
1> Open Registry Editor (By typing regedit at the Run prompt)
2> Select HKEY_CLASSES_ROOT and find .avi (any of the mpg,mpeg will do)
3> Export its registry settings (will be saved as *.reg)
4> Right click on *.reg file and select Edit
5> Now if you want *.divx files to be treated in the same way as *.avi files then just replace avi by divx in the file. Save it and execute it.
6> Repeat Step5 for various files of whom you want to change the behaviour.

Note:This doesnt work for *.vob files.

1 comments:

Tracking A Hacker

Posted by tech master  |  at  11:04 PM

Sometimes, it's just not enough to simply know that there's a Trojan or Virus onboard. Sometimes you need to know exactly why that file is onboard, how it got there - but most importantly, who put it there.

By enumerating the attacker in the same way that they have enumerated the victim, you will be able to see the bigger picture and establish what you're up against. But how can you do this? Read on...

## Connections make the world go round ##

The computer world, at any rate. Every single time you open up a website, send an email or upload your webpages into cyberspace, you are connecting to another machine in order to get the job done. This, of course, presents a major problem, because this simple act is what allows malicious users to target a machine in the first place.

# How do these people find their victim?

Well, first of all, they need to get hold of the victim's IP Address. Your IP (Internet Protocol) address reveals your point of entry to the Internet and can be used in many ways to cause your online activities many, many problems. It may not reveal you by name, but it may be uniquely identifiable and it represents your digital ID while you are online (especially so if you're on a fixed IP / DSL etc).

With an IP address, a Hacker can find out all sorts of weird and wonderful things about their victim (as well as causing all kinds of other trouble, the biggest two being Portnukes/Trojans and the dreaded DoS ((Denial of Service)) attack). Some Hackers like to collect IP Addresses like badges, and like to go back to old targets, messing them around every so often. An IP address is incredibly easy to obtain - until recently, many realtime chat applications (such as MSN) were goldmines of information. Your IP Address is contained as part of the Header Code on all emails that you send and webpages that you visit can store all kinds of information about you. A common trick is for the Hacker to go into a Chatroom, paste his supposed website address all over the place, and when the unsuspecting victim visits, everything about your computer from the operating system to the screen resolution can be logged...and, of course, the all important IP address. In addition, a simple network-wide port scan will reveal vulnerable target machines, and a war-dialler will scan thousands of lines for exposed modems that the hacker can exploit.

So now that you know some of the basic dangers, you're probably wondering how these people connect to a victim's machine?

## Virtual and Physical Ports ##

Everything that you recieve over the Internet comes as a result of other machines connecting to your computer's ports. You have two types; Physical are the holes in the back of your machine, but the important ones are Virtual. These allow transfer of data between your computer and the outside world, some with allocated functions, some without, but knowing how these work is the first step to discovering who is attacking you; you simply MUST have a basic knowledge of this, or you won't get much further.

# What the phrases TCP/UDP actually mean

TCP/IP stands for Transmission Control Protocol and Internet Protocol, a TCP/IP packet is a block of data which is compressed, then a header is put on it and it is sent to another computer (UDP stands for User Datagram Protocol). This is how ALL internet transfers occur, by sending packets. The header in a packet contains the IP address of the one who originally sent you it. Now, your computer comes with an excellent (and free) tool that allows you to see anything that is connected (or is attempting to connect) to you, although bear in mind that it offers no blocking protection; it simply tells you what is going on, and that tool is NETSTAT.

## Netstat: Your first line of defence ##

Netstat is a very fast and reliable method of seeing exactly who or what is connected (or connecting) to your computer. Open up DOS (Start/Programs/MS-DOS Prompt on most systems), and in the MSDOS Prompt, type:

netstat -a

(make sure you include the space inbetween the "t" and the "a").

If you're connected to the Internet when you do this, you should see something like:


Active Connections

Proto Local Address Foreign Address State
TCP macintosh: 20034 modem-123.tun.dialup.co.uk: 50505 ESTABLISHED
TCP macintosh: 80 proxy.webcache.eng.sq: 30101 TIME_WAIT
TCP macintosh MACINTOSH: 0 LISTENING


Now, "Proto(col)" simply means what kind of data transmission is taking place (TCP or UDP), "Local address" is your computer (and the number next to it tells you what port you're connected on), "Foreign Address" is the machine that is connected to you (and what port they're using), and finally "State" is simply whether or not a connection is actually established, or whether the machine in question is waiting for a transmission, or timing out etc.

Now, you need to know all of Netstat's various commands, so type:

netstat ?

You will get something like this:


Displays protocol statistics and current TCP/IP network connections.

NETSTAT [-a] [-e] [-n] [-s] [-p proto] [-r] [interval]

-a Displays all connections and listening ports.
-e Displays Ethernet statistics. This may be combined with the -s option.
-n Displays addresses and port numbers in numerical form.
-p proto Shows connections for the protocol specified by proto; proto may be TCP or UDP. If used with the -s option to display per-protocol statistics, proto may be TCP, UDP, or IP.
-r Displays the routing table.
-s Displays per-protocol statistics. By default, statistics are shown for TCP, UDP and IP; the -p option may be used to specify a subset of the default.


Have a play around with the various options, but the most important use of these methods is when you combine them. The best command to use is

netstat -an

because this will list all connections in Numerical Form, which makes it a lot easier to trace malicious users....Hostnames can be a little confusing if you don't know what you're doing (although they're easily understandable, as we shall see later). Also, by doing this, you can also find out what your own IP address is, which is always useful.

Also,

netstat -b

will tell you what ports are open and what programs are connecting to the internet.

## Types of Port ##

It would be impossible to find out who was attacking you if computers could just access any old port to perform an important function; how could you tell a mail transfer from a Trojan Attack? Well, good news, because your regular, normal connections are assigned to low, commonly used ports, and in general, the higher the number used, the more you should be suspicious. Here are the three main types of port:

# Well Known Ports These run from 0 to 1023, and are bound to the common services that run on them (for example, mail runs on channel 25 tcp/udp, which is smtp (Simple Mail Transfer Protocol) so if you find one of these ports open (and you usually will), it's usually because of an essential function.

# Registered Ports These run on 1024 to 49151. Although not bound to a particular service, these are normally used by networking utilities like FTP software, Email client and so on, and they do this by opening on a random port within this range before communicating with the remote server, so don't panic (just be wary, perhaps) if you see any of these open, because they usually close automatically when the system that's running on them terminates (for example, type in a common website name in your browser with netstat open, and watch as it opens up a port at random to act as a buffer for the remote servers). Services like MSN Messenger and ICQ usually run on these Ports.

# Dynamic/Private Ports Ranging from 49152 to 65535, these things are rarely used except with certain programs, and even then not very often. This is indeed the usual range of the Trojan, so if you find any of these open, be very suspicious. So, just to recap:


Well Known Ports 0 to 1023 Commonly used, little danger.
Registered Ports 1024 to 49151 Not as common, just be careful.
Dynamic/Private Ports 49152 to 65535 Be extremely suspicious.


## The hunt is on ##

Now, it is essential that you know what you're looking for, and the most common way someone will attack your machine is with a Trojan. This is a program that is sent to you in an email, or attempts to bind itself to one of your ports, and when activated, it can give the user your passwords, access to your hard drive...they can even make your CD Tray pop open and shut. At the end of this Document, you will find a list of the most commonly used Trojans and the ports they operate on. For now, let's take another look at that first example of Netstat....


Active Connections

Proto Local Address Foreign Address State
TCP macintosh: 27374 modem-123.tun.dialup.co.uk: 50505 ESTABLISHED
TCP macintosh: 80 proxy.webcache.eng.sq: 30101 TIME_WAIT
TCP macintosh MACINTOSH: 0 LISTENING


Now, straight away, this should make more sense to you. Your computer is connected on two ports, 80 and 27374. Port 80 is used for http/www transmissions (ie for all intents and purposes, its how you connect to the net, although of course it's a lot more complicated than that). Port 27374, however, is distinctly suspicious; first of all, it is in the registered port range, and although other services (like MSN) use these, let's assume that you have nothing at all running like instant messengers, webpages etc....you're simply connected to the net through proxy. So, now this connection is looking even more troublesome, and when you realise that 27374 is a common port for Netbus (a potentially destructive Trojan), you can see that something is untoward here. So, what you would do is:


1) run Netstat , and use:

Netstat -a

then

Netstat -an

So you have both Hostnames AND IP addresses.


## Tracerouting ##

Having the attacker's IP is all well and good, but what can you do with it? The answer is, a lot more! It's not enough to have the address, you also need to know where the attacker's connections are coming from. You may have used automated tracerouting tools before, but do you jknow how they work?

Go back to MSDOS and type


tracert *type IP address/Hostname here*


Now, what happens is, the Traceroute will show you all the computers inbetween you and the target machine, including blockages, firewalls etc. More often than not, the hostname address listed before the final one will belong to the Hacker's ISP Company. It'll either say who the ISP is somewhere in there, or else you run a second trace on the new IP/hostname address to see who the ISP Company in question is. If the Hostname that you get back doesn't actually seem to mention an actual geographical location within its text, you may think all is lost. But fear not! Suppose you get a hostname such as

http://www.haha.com

Well, that tells us nothing, right? Wrong....simply enter the hostname in your browser, and though many times you will get nothing back, sometimes it will resolve to an ISP, and from there you can easily find out its location and in what areas they operate. This at least gives you a firm geographical location to carry out your investigations in.

If you STILL have nothing, as a last resort you COULD try connecting to your target's ISP's port 13 by Telnet, which will tell you how many hours ahead or behind this ISP is of GMT, thus giving you a geographical trace based on the time mentioned (although bear in mind, the ISP may be doing something stupid like not having their clocks set correctly, giving you a misleading trace. Similarly, a common tactic of Hackers is to deliberately have their computer's clock set to a totally wrong time, so as to throw you off the scent). Also, unless you know what you're doing, I wouldn't advise using Telnet (which is outside the parameters of this tutorial).

## Reverse DNS Query ##

This is probably the most effective way of running a trace on somebody. If ever you're in a chatroom and you see someone saying that they've "hacked into a satellite orbiting the Earth, and are taking pictures of your house right now", ignore them because that's just bad movie nonsense. THIS method is the way to go, with regard to finding out what country (even maybe what State/City etc) someone resides, although it's actually almost impossible to find an EXACT geographical location without actually breaking into your ISP's Head Office and running off with the safe.

To run an rDNS query, simply go back to MS-DOS and type

netstat

and hit return. Any active connections will resolve to hostnames rather than a numerical format.

# DNS

DNS stands for Domain Name Server. These are machines connected to the Internet whose job it is to keep track of the IP Addresses and Domain Names of other machines. When called upon, they take the ASCII Domain Name and convert it to the relevant numeric IP Address. A DNS search translates a hostname into an IP address....which is why we can enter "www.Hotmail.com" and get the website to come up, instead of having to actually remember Hotmail's IP address and enter that instead. Well, Reverse DNS, of course, translates the IP Address into a Hostname (ie - in letters and words instead of numbers, because sometimes the Hacker will employ various methods to stop Netstat from picking up a correct Hostname).

So, for example,

298.12.87.32 is NOT a Hostname.
mail6.bol.net.au IS a Hostname.

Anyway, see the section at the end? (au) means the target lives in Australia. Most (if not all) hostnames end in a specific Country Code, thus narrowing down your search even further. If you know your target's Email Address (ie they foolishly sent you a hate mail, but were silly enough to use a valid email address) but nothing else, then you can use the Country codes to deduce where they're from as well. You can also deduce the IP address of the sender by looking at the emails header (a "hidden" line of code which contains information on the sender)...on Hotmail for example, go to Preferences, and select the "Full Header's Visible" option. Alternatively, you can run a "Finger" Trace on the email address, at:

www.samspade.org

Plus, some ISP's include their name in your Email Address with them too (ie Wanadoo, Supanet etc), and your Hacker may be using an email account that's been provided by a Website hosting company, meaning this would probably have the website host's name in the email address (ie Webspawners). So, you could use the information gleaned to maybe even hunt down their website (then you could run a website check as mentioned previously) or report abuse of that Website Provider's Email account (and thus, the Website that it goes with) to

abuse@companynamegoeshere.com

If your Hacker happens to reside in the USA, go to:

www.usps.gov/ncsc/lookups/abbr_state.txt

for a complete list of US State abbreviatons.

## List of Ports commonly used by Trojans ##

Please note that this isn't a complete list by any means, but it will give you an idea of what to look out for in Netstat. Be aware that some of the lower Ports may well be running valid services.

UDP: 1349 Back Ofrice DLL
31337 BackOfrice 1.20
31338 DeepBO
54321 BackOfrice 2000


TCP: 21 Blade Runner, Doly Trojan, Fore, Invisible FTP, WebEx, WinCrash
23 Tiny Telnet Server
25 Antigen, Email Password Sender, Haebu Coceda, Shtrilitz Stealth, Terminator, WinPC, WinSpy, Kuang2 0.17A-0.30
31 Hackers Paradise
80 Executor
456 Hackers Paradise
555 Ini-Killer, Phase Zero, Stealth Spy
666 Satanz Backdoor
1001 Silencer, WebEx
1011 Doly Trojan
1170 Psyber Stream Server, Voice
1234 Ultors Trojan
1243 SubSeven 1.0 - 1.8
1245 VooDoo Doll
1492 FTP99CMP
1600 Shivka-Burka
1807 SpySender
1981 Shockrave
1999 BackDoor 1.00-1.03
2001 Trojan Cow
2023 Ripper
2115 Bugs
2140 Deep Throat, The Invasor
2801 Phineas Phucker
3024 WinCrash
3129 Masters Paradise
3150 Deep Throat, The Invasor
3700 Portal of Doom
4092 WinCrash
4567 File Nail 1
4590 ICQTrojan
5000 Bubbel
5000 Sockets de Troie
5001 Sockets de Troie
5321 Firehotcker
5400 Blade Runner 0.80 Alpha
5401 Blade Runner 0.80 Alpha
5402 Blade Runner 0.80 Alpha
5400 Blade Runner
5401 Blade Runner
5402 Blade Runner
5569 Robo-Hack
5742 WinCrash
6670 DeepThroat
6771 DeepThroat
6969 GateCrasher, Priority
7000 Remote Grab
7300 NetMonitor
7301 NetMonitor
7306 NetMonitor
7307 NetMonitor
7308 NetMonitor
7789 ICKiller
8787 BackOfrice 2000
9872 Portal of Doom
9873 Portal of Doom
9874 Portal of Doom
9875 Portal of Doom
9989 iNi-Killer
10067 Portal of Doom
10167 Portal of Doom
10607 Coma 1.0.9
11000 Senna Spy
11223 Progenic trojan
12223 Hack´99 KeyLogger
12345 GabanBus, NetBus
12346 GabanBus, NetBus
12361 Whack-a-mole
12362 Whack-a-mole
16969 Priority
20001 Millennium
20034 NetBus 2.0, Beta-NetBus 2.01
21544 GirlFriend 1.0, Beta-1.35
22222 Prosiak
23456 Evil FTP, Ugly FTP
26274 Delta
30100 NetSphere 1.27a
30101 NetSphere 1.27a
30102 NetSphere 1.27a
31337 Back Orifice
31338 Back Orifice, DeepBO
31339 NetSpy DK
31666 BOWhack
33333 Prosiak
34324 BigGluck, TN
40412 The Spy
40421 Masters Paradise
40422 Masters Paradise
40423 Masters Paradise
40426 Masters Paradise
47262 Delta
50505 Sockets de Troie
50766 Fore
53001 Remote Windows Shutdown
54321 SchoolBus .69-1.11
61466 Telecommando
65000 Devil


## Summary ##

I hope this tutorial is useful in showing you both how to secure yourself against unwanted connections, and also how to determine an attacker's identity. The Internet is by no means as anonymous as some people think it is, and although this is to the detriment of people's security online, this also works both ways....it IS possible to find and stop even the most determined of attackers, you just have to be patient and keep hunting for clues which will help you put an end to their exploits.

1 comments:

Avoid USB devices Virus / Worms

Posted by tech master  |  at  6:45 PM

USB Devices like i-pod,pen drives e.t.c; brings viruses/worms which are bad since it disables a lot of features as well as it ruins memory the slows down the whole thing. It disables much of the removal process like Windows RegEdit.exe, MsConfig.exe and also TaskMan.exe. Variations of these also disables your keyboard during normal booting, floods your disk with virus files in the root directory and also the windows directory and some also floods your directory with Folder looking icons that is an executable..

So heres my tip in avoiding this:

1. Always make all files visible like system and also hidden files with their extension shown.
Go to Windows Explorer > Tools > Folder Option > View
* Enable Show Hidden File
* Disable Hide Extensions for know file type
* Disable Hide Protected OS files


2. Never Use the Autorun functionality in Windows
whenever you put a disk(flash, memory card, usb drive devices and other form of removable drive) it is always a practice to scan it first. but to avoid being the first to be infected by a wild one, always use Windows Explorer to browse the files. Use the left side(Folder Window), to browse the files. Whenever you see an autorun.inf file, delete it! remove the disk and insert it again to avoid clicking it.
To disable autorun go to gpedit.msc >> computer config >> admin templates >> system >> turn off autoplay

3. Always update Virus database!

1 comments:

How to connect to Internet on your Mobile using Broadband

Posted by tech master  |  at  11:39 AM

Sony Ericsson Users can now access all internet services free of cost using your Broadband connection.

My model Sony Ericsson w700i must use TCP/IP for its data connection. I thought why not make a TCP/IP connection to my local area LAN and surf the Internet through my broadband? The first thing i can do is to ask google. I have found some forums talking about this and a perfect procedure was found in the above URL.

I would like to credit the whole thing to the creator Andre
Source : http://users.skynet.be/yozy/tutorials/

Required Things:

1. Sony Ericsson Compatible Model

MIDP 1.0 and CLDC 1.04:
- P800 series
- T610 series
- T630 series
- Z600 series

MIDP 2.0 and CLDC 1.0 HI:
- P900/P910 series

MIDP 2.0 and CLDC 1.1:

- S700/S710 series
- V800
- F500i

- J300 series

- K300 series
- K310 series
- K500 series
- K510 series
- K600 series
- K610 series (Java Platform 7)
- K700 series
- K790 series (Java Platform 7)
- K750 series
- K800 series (Java Platform 7)

- P900
- P910
- P990

- M600

- W300 series
- W550 series
- W600 series
- W700 series
- W710 series (Java Platform 7)
- W800 series
- W810 series
- W850 series (Java Platform 7)
- W900 series
- W950 series

- Z520 series
- Z530 series
- Z550 series
- Z710 series (Java Platform 7)
- Z800 series
- Z525
- Z500a
- Z1010

2. Necessary Software

1. The J2SE Software Development Kit (SDK)
Mirror site : JAVA SDK

2. Sony Ericsson SDK

3. Opera Mini : Best way is to download the compatible version for your mobile from Opera Official site.

Step wise procedure:


1. First install JAVA JDK and then SONY ERICSSON SDK. Downloading these two things would be a little problem but cant help...

2. Connect your mobile to PC via bluetooth or USB.

2. When the Sonyericsson SDK installed successfully, you should find a Connection Proxy icon on your system tray, otherwise Click Start > Programs > Sony Ericsson > J2ME SDK > ConnectionProxy to start the connection proxy which while active will show its status on the system tray.

3. Click on Settings icon (Gear). Select correct COM port for your connection. Choosing correct COM port would not be a big task. Open your device manager and you will find the com ports for your mobile USB/Bluetooth connection. Choose the lowest COM port apart from the COM ports that are attached to your system. Choose the BaudRate as 115200.

4. Now click Connect. You should see your mobile pic on the connection proxy saying that it is connected. ( see the source URL for sample Pic)

5. Open Sony Ericsson Device Explorer.
Click Start > Program > Sony Ericsson > J2ME SDK > Device Explorer. You should see that the software is negotiating a connection with your mobile, and when successful, it will display a list of applications installed. In my case it displayed all the games installed in my W700 games folder.

Important Note : If anyone faces error at this particular step saying "Malformed Response...... .... " then it is due to some error in parsing the characters in the installed games. Delete games one by one in your games folder and Refresh the Device Explorer. It should work at some time..

6. In Sony Ericsson Device Explorer menu bar, click File and check Serial Networking and restart the Device Explorer. WIth this, the settings on the system is completed.

7. On your Sony Ericsson mobile, create a new data account.
For that, Go to Connectivity > Data comm. > Data accounts > New account.
Account type: GPRS data
Name: Anything you want. Leave APN, Username and Password empty.

8. Go to Connectivity > Internet setting > Internet profiles > New profile
Name: anything you want
Connect using: select the account you just added in the above step

9. Still in Internet profiles window, highlight the profile you going to use and press More and select Settings.
In this window:
Connect using: the new data account you just added
Internet Mode: Http (already there)
Use Proxy: No
Username and Password: empty

Press Save to save this profile

Quote:
Note: For broadband users under Corporate LAN, The settings are different. Use this profile settings.

here.. Note the following...
My IP address in LAN : 172.16.5.111
DNS Address : 172.24.2.71
Proxy server Address : 172.30.3.3


create a data account named "broadband"
ip address : 172.16.5.111
dns address : 172.24.2.71

create an internet profile named " broadband"
internet mode : http
use proxy : yes
proxy address: 172.30.3.3
port : 8080

streaming settings :
connect using : broadband
use proxy : yes
proxy address: 172.16.5.111
port number : 6082
10. Opera Mini Installation

Default browser that comes with sony ericsson mobile just not mean to be used with this type of connection. You need to download other browser to be installed. Download the compatible version of opera for your model from its official site. You must download both jar and jad files. This is a quick download since the file is quite small. Now you can install Opera Mini browser by just rightclicking the JAD File you just downloaded and select "Install on Device".
When installation is successful, highlight the Opera Mini in the Device Explorer and click on "Play button", or right click and select Start to launch the Opera Mini on your mobile.

Note : Launching Opera Mini by using the phone itself will not work.

11. Now, If you are using Opera 3.0, it tests for network connection before opening the browser. If the connection test fails, check your settings once again. Restart your phone and try again. If everything is correct, i would suggest you to download opera mini 2.0. and proceed with the same steps above. Search google or download it from here ( Copy it to your phone and install from the phone since i cannot upload a jad file in my hosting site.)

12. Enter any URL in your mobile and you are done if you are able to see that site on your mobile..

Note: Please do not expect that you will be succeeded in the first trial. There is every possiblity that you may miss small things. I have spent one complete day for the connection and then succeded.

Some Points to note :
1. Make sure "Serial Networking" is checked in device explorer.
2. Connection proxy is connected
3. Device explorer shows all the applications(games) installed on your mobile. If not, try restarting your device explorer.
4. If every setting is correct and still you are not able to connect to internet, restart your mobile
5. Use Opera mini 2.0 Advanced instead of latest version if you are not able to connect using it.


Finally... Please post your results in this thread so that people facing problems can troubleshoot...

2 comments:

How to protect your PC from infected pen drives

Posted by tech master  |  at  11:33 AM

While the utility of pen drives cannot be undermined, they have become an easy ride for viruses and worms to spread from one computer to another and create mayhem. I have no idea how people manage to catch these exotic species … 9 out of 10 pen drives that I plug into my computer carry viruses. The biggest threat to my computer is not Internet and email but pen drives.

Most pen drive viruses infect by executing itself the moment the pen drive is inserted into the PC. They do it by creating an autorun.ini file that is configured to run these viruses. So the first line of defense is to prevent the execution of the autorun.ini file. Here are two software that does it.

USB Firewall runs silently in the background and alerts you immediately in case of an intrusion attempt. The application detects whenever any program tries to launch itself via the autorun.ini file and informs you. You can then remove the autorun.ini file along with the malicious files before they have the chance to infect the PC.

usb-firewall

USB Firewall is not an anti-virus application and cannot distinguish between malicious and legitimate files. It just prevents the auto play of pen drives and the files on it. However, in most cases an autorun file on a pen drive is a sure sign of a virus, unless the owner has created it himself for some added functionality. Also, the pen drive may still contain infected files not configured to autorun but waiting for the user to execute. You need to have an anti-virus application guarding your PC to prevent such infection.

Another application similar to USB Firewall is iKill. iKill scans removable drives for the presence of the autorun.ini file. If found, it parses the autorun.inf file for the executables it may run and if AutoProtect is enabled, it automatically delete the files present on the drive. Otherwise, you will be asked if you want the suspected files deleted.

iKill

In case, you want to completely disable the auto run feature in Windows, this is how to do it.

  1. Go to Start> Run and type gpedit.msc to launch the Group Policy editor.
  2. Select ‘Computer configuration’ from the left tree and then go to Administrative Tempates>System
  3. In the right panel look for ‘Turn off Autoplay’. Double click on it and select ‘Enabled’ and then select 'all drives'.

0 comments:

how to convert Ntfs to FAT32

Posted by tech master  |  at  11:30 AM

Do you want to convert Ntfs to FAT32??
I have a solution for your problem. Ntfs can be converted to FAT32 without losing data. Here's how. Follow the exact steps or it may cost you data loss.

Maybe I could change your mind
------------------------------
Make completely sure that you need to convert Ntfs to FAT32. You should have no reason to if you don't intend to install older OS which do to support Ntfs.
>>Disk access is faster in Ntfs than in FAT32
>>Fragmentation has less impact on performance in Ntfs. Defragmentation is also very quick.
>>Windows does not have to check disk even if it is shut down improperly. Data loss does not take place during improper shutdown on Ntfs volumes.
>>Conversion process may lead to data loss.
So think properly before doing this.

Caution:
--------
Using this program may be illegal and may cause data loss. Make sure that you have backed up your data to another HDD or CD-R before using the procedure explained...

Requirements:
-------------
1. A Computer Running Windows (95 or later)
2. A Blank FAT32 Formatted Floppy Disk
3. A Working Floppy Disk Drive
4. Minimal Amount of Knowledge on use of Computers and simple terms
5. Little bit of Patience and Discipline
6. A zip file from
7. An Unzipper (Winzip, WinRAR, Zip Genious, WinXP inbuilt Zipfile support or any Unzippers you can find)

Procedure:
----------
1. Make sure that you have 1, 2 and 3 and of course 4 and 5. Make sure that the drive you want to convert to FAT32 DOES NOT have ANY COMPRESSED and/or ENCRYPTED FILES. Decompress/Decrypt them all before proceeding.
2. Get 6 by downloading.
3. Get 7 by downloading or browsing old Digit CDs. If you have Windows XP, you don't need one.
4. Unzip pqboot.zip to any folder. Keep all the files in the same folder.
5. Read the Readme.txt (included in the pqmagic.zip) for information on how to use the program to create a bootable floppy with Partition Magic with the help of the files provided.
6. Boot with the floppy created.
7. Run pqmagic.exe from the floppy.
8. Perform the required operation. For eg., in this case, you'd want to convert Ntfs to FAT32, so in Partition Magic, choose Operations>>Convert>>Ntfs to Fat32, by selecting the drive you'd want to convert to Ntfs.
9. After the Operation is complete, take the floppy out and hit Ctrl+Alt+Del to reboot your PC.
10. Look to see if booting is normal. It should be.
11. Be happy for what you have done.
12. DOn't forget that I have helped you.
13. Thank me (Optional).
14. Post back in the forum saying something like "The process explained by _khAttAm_ works....... It rocks" or something like that.

Result:
-------
1. At least a FAT32 drive created.
2. A happy you.

Source:
-------
The instructions are completely written by me. (you had alresdy guessed that)
The file pqmagic.zip contains the following files with their sources:
1. Readme.txt-- Written By Me
2. DI.exe-- I got it from a website. I think it was http://www.bootdisk.com in a Zip archive with some other files.
3. bootmake.exe-- I myself wrote and compiled it with the help of Quick Batch File Compiler.
4. Bootable Floppy Maker.pif-- Made it myself. It is a MS-Dos shortcut and I can make it, of course.
5. pq.img-- It is a bootable floppy image created with the help of Windows 98 'sys' command and the other files required for Partition Magic are copied onto it, in a virtual floppy drive, in a virtual environment, under MS-Virtual Machine.

Acknowlwdgement:
----------------
1. Thanks to you all for taking time to read all this @$%*.
2. Thanks to my mom who never lets me use the computer.
3. Thanks to my college where I have an exam now, so I don't want to study at all and have time for all these.

SH!T........ why am I writing all these?? And Why are you reading all these?? ..............
You have already had the job done right??

1 comments:

Prevent Getting Banned From Adsense

Posted by tech master  |  at  11:29 AM

Dont ever get banned from adsense if you have clicked your ads,by mistake…follow this technique

The way I keep this from happening is I temporarily block
the domain name Google’s ads are served from.

First, find your HOSTS file which depends on which os you are using.

Open Notepad or any text editor. Go to File, and Choose Open.

If you have Windows 95, 98, or ME browse to the folder
“C:\windows”

If you have Windows XP Home browse to the folder
“C:\windows\system32\drivers\etc”

If you have anything else (Windows XP Pro, Windows 2000, NT,
2003, etc.) browse to the folder:
“C:\winnt\system32\drivers\etc”

Once you’re there, open the file called “hosts”. If you
don’t see anything listed just type the word hosts and the
file should open up. Just the word “hosts”, no extension or
anything after that. It’s probably blank but it might not
be.

Add this line:

127.0.0.1 pagead2.googlesyndication.com

And save. You’re done.

Now go back to a site that you know has some Google Ads.
There should be an empty space where the ads appeared.

Want to turn it off? Don’t just delete it, put a “#” sign in
front of that line, like this which is equivalent to commenting the statement:

# 127.0.0.1 pagead2.googlesyndication.com

What’s that do? It basically says “ignore this line.” I like
to leave it like that so when I want to hide Google Ads
again, all I have to do is remove the “#” sign and save –
then put the “#” back in when I’m ready to go back to
normal.

To me, making a quick change in your HOSTS file to turn
AdSense on and off is easier than fiddling around with a
firewall program.

Hope this helps.

2 comments:

How to download endlessly from megaupload.com

Posted by tech master  |  at  11:29 AM

Here's my tutorial to download from megauload.com without getting the annoying message of 300 slots busy.


For FIREFOX:
Click Install Now to install addon.

Restart FireFox. Tool-->User Agent Switcher--->Options--->Options

Click User Agents--->Add

Type this:

+ Description: MEGAUPLOAD

+ User Agent: Mozilla/4.0 (compatible; MSIE 6.0; Windows NT 5.1; SV1; Alexa Toolbar)

Click OK twice to finish adding User Agent.

From now, before downloading any file on megaupload just go Tools--> User Agent Switcher--->MEGAUPLOAD.

For IE:

Start/run->> type regedit -> ok

Go to: [HKEY_LOCAL_MACHINE\SOFTWARE\Microsoft\Windows\Curr entVersion\Internet Settings\5.0\User Agent\Post Platform]

Note: if U use IE 7

go to: [HKEY_LOCAL_MACHINE\SOFTWARE\Microsoft\Windows\Curr entVersion\Internet Settings\User Agent\Post Platform]

Right click on Post Platform > New > String Value > type Alexa Toolbar > ok

Now U can download from megaupload without error : "All download slots (..) assigned to your country (....) are in use"

Have fun!

0 comments:

How to turn any application portable and run from a USB drive

Posted by tech master  |  at  11:28 AM

We will use a software called Thinstall. Thinstall is an Application Virtualization Platform that enables complex software to be transformed into self-contained EXE files which can run instantly with zero installation from any data source. It creates a virtual operating system, a type of sandbox, around each “Thinstalled” application with it's own virtual registry and file system. Everything is good about Thinstall except it's price which is an outrageous $4,995. (What were they thinking when they priced that!). A fully functional 30 day trial version is available for download on request (even that can be a little difficult to obtain).

Let us create a portable version of MS Office 2003

Thinstall requires you to have a clean PC, one that has been freshly installed with Windows. Also the application that you are converting into a portable one shouldn't be already installed in the machine. But don't worry, it works equally well with an old Windows system. I had MS Office 2003 on my system but I had it removed prior to this process and it worked with any problem. However, it might not work with all application. In that case, you can carry the following operations on a virtual PC.

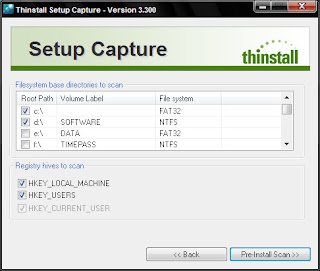
1. Install Thinstall and run Setup Capture (the application's main executable). Click Start.

2. Select drive C and the drive where you plan to install the application (in this case, MS Office). If you want to install MS Office in drive C itself, then select only drive C.


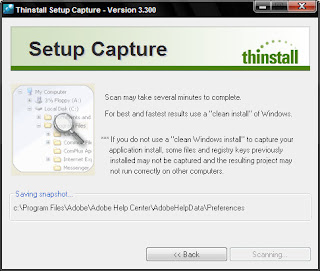
3. Click Pre-Install Scan and allow the program to complete scanning of the selected drives.


4. After it finishes scanning, install MS Office on your PC like you normally would.

5. After you have finished installing Office, click Post-Install Scan and again wait till it completes.

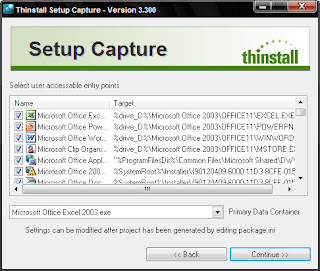
6. You will be now asked to select the executables that you wish to make portable. Select all the boxes from the list and click continue.


7. Finally you will asked to specify a path where you wish to store the files.

8. Now open the directory where the files were saved and run build.bat.

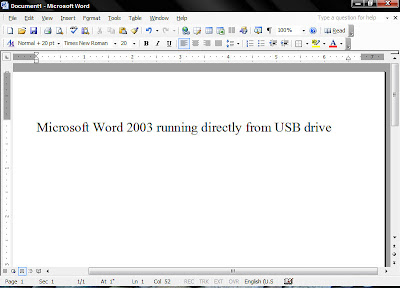
Thinstall will now create the portable files required and save them inside a folder named bin inside the same directory. Inside bin you will find the self contained exe files of MS Office. Copy this directory into your USB drive. Now you can run MS Office directly from the thumb drive.


I even made a portable version of Photoshop CS2. Create as many portable applications you like!

1 comments:

How to trace mobile phone location in India

Posted by tech master  |  at  3:37 PM

Check this web application, you can automatically determine the mobile phone location and service provider details using this,
click here

0 comments:

Enabling right click on sites that disable it

Posted by tech master  |  at  3:31 PM

Lots of web sites have disabled the right click function of the mouse button... it's really, really annoying. This is done so that you don't steal (via right-click->save picture) their photos or images or any other goodies. Unfortunately, it disables ALL right-click functionality: copy, paste, open in new window.

It's easy to change, assuming your using IE 6:
Click "Tools"->"Internet Options"
Click the "Security" tab
Click "Custom Level"
Scroll down to the "Scripting" section
Set "Active Scripting" to "disable"
Click "Ok" a couple of times.

You'll probably want to turn this back to "enable" when your done... 'cause generally the javascript enhances a website.

0 comments:

Google Adsense Tips, Tricks, and Secrets

Posted by tech master  |  at  3:22 PM

I’ve been reading a few forums and blogs about Google Adsense tips lately, and thought it would be helpful to consolidate as many as possible in one place without the comments. I’ve also thrown in a few tips of my own. We start out with some of the basic general stuff and move to the more specific topics later on.

Build an Empire?

When you’re deciding to become a website publisher you will fall into one of two broad categories:

  • Publish 100 websites that each earn $1 a day profit
  • Publish 1 website that earns $100 a day profit

The reality of it is, most people end up somewhere in between. Having 100 websites leaves you with maintenance, management and content issues. Having one website leaves you open to all sort of fluctuations (search engines algorithm’s, market trends, etc). You can adapt your plan on the way, but you’ll have an easier time if you start out going in the direction of where you want to end up.

General or Niche

You can build your website around general topics or niche ones. Generally speaking niche websites work better with adsense. First off the ad targeting is much better. Secondly as you have a narrow focus your writing naturally becomes more expert in nature. Hopefully this makes you more authority in your field.

If this is your first try at building an adsense website, make it about something you enjoy. It will make the process much easier and less painful to accomplish. You should however make sure that your topic has enough of an ad inventory and the payout is at a level you are comfortable with. You may love medieval folk dancing, but the pool of advertisers for that subject is very small (in fact it’s currently zero).

Once you’ve gotten the hang of how Adsense works on a website, you are going to want to dabble in some high paying keywords, you may even be tempted to buy a high paying keyword list. This does come with some dangers. First off the level of fraud is much higher on the big money terms. Secondly there is a distortion of the supply and demand relationship for these terms. Everyone wants ads on their website that make $35 or more a click, however the number of advertisers who are willing to pay that much is pretty limited. Additionally the competition for that traffic is going to be stiff. So, don’t try to run with the big dogs if you can’t keep up. If you have to ask if you’re a big dog, then chances are, you’re not. I have used a high dollar keywords report fromcashkeywords.com and was pleased with my results (see cash keywords free offer recap).

New Sites, Files and Maintenance

When you’re building a new site don’t put adsense on it until it’s finished. In fact I’d go even farther and say don’t put adsense on it until you have built inbound links and started getting traffic. If you put up a website with “lorem ipsum” dummy or placeholder text, your adsense ads will almost certainly be off topic. This is often true for new files on existing websites, especially if the topic is new or different. It may take days or weeks for google’s media bot to come back to your page and get the ads properly targeted. TIP: If you start getting lots of traffic from a variety of IP’s you will speed this process up dramatically.

I like to build my sites using include files. I put the header, footer and navigation in common files. It makes it much easier to maintain and manage. I also like to put my adsense code in include files. If I want/need to change my adsense code, it’s only one file I have to work with. TIP: I also use programming to turn the adsense on or off. I can change one global variable to true or false and my adsense ads will appear or disappear.

Managing URL’s and channels

Adsense channels is one area where it’s really easy to go overboard with stats. You can set up URL channels to compare how one website is doing to another. You can also set up sub channels for each URL. If you wanted to you do something channels like this:

  • domain1.com - 728 banner
  • domain1.com - 336 block
  • domain1.com - text link
  • domain2.com - 728 banner
  • domain2.com - image banner
  • domain2.com - 336 block
  • domain3.com - 300 block

While this is great for testing and knowing who clicks where and why, it makes your reporting a little wonky. Your total number will always be correct but when you look at your reports with a channel break down things will get displayed multiple times and not add up to correct total. Makes things pretty confusing, so decide if you really need/want that level of reporting detail. TIP: At the very least you want to know what URL is generating the income so be sure to enter distinct URL channels.

Site Design and Integration


Once you know you are going to put adsense on your website you’re going to have to consider where to put it. If this is new site it’s easier, if it’s an existing site it’s more difficult. While there are some people who will be able to do it, in most cases I’d say if you just slap the adsense code in, you’ll end up with a frankensite monster (props to Tedster of WMW for the buzzword). While every website is different, Google has published some heat maps showing the optimal locations. No surprise that the best spots are middle of the page and left hand side. Now I’ve done really well by placing it on the right, but you should know why you’re doing it that way before hand, and be prepared to change it if it doesn’t work out.

Google has also has published a list of the highest performing ad sizes:

  • 336×280 large rectangle
  • 300×250 inline rectangle
  • 160×600 wide skyscraper

From the sites that I run, I do really well with the 336 rectangle and 160 skyscraper. My next best performing ad size is the 728 leaderboard, I don’t really use the 300 inline rectangle too often. So really it depends on how well you integrate these into your site. Placement can have a dramatic effect on performance. TIP: When working on a new site or new layout you may want to give each location it’s own channel for a little while until you understand the users behavior.

Another ‘trick’ that can increase your CTR is by blending your adsense into your body copy. For example if your body copy is black, remove the adsense border and make the title, text, and URL black.TIP: Try changing all of your page hyperlinks to a high contrast color (like dark red or a bold blue) then change the adsense title to the same color.

The one area where I’ve found blended ads don’t perform as well is forums, especially ones with a high volume of repeat members. Regular visitors develop banner blindness pretty quickly. One ‘trick’ to keep the ads from being ignored is to randomize the color and even the placement. As with any of the decisions about location, placement and color it’s a trade off. How much do you emphasize the ads without annoying your visitors. Remember it’s better to have a 1% CTR with 500 regular visitors as opposed to a 5% CTR with 50 visitors. TIP: For forums try placing the adsense ads directly above or below the the first forum thread.

Using Images

One of the latest ’secrets’ to make the rounds is using images placed directly above or below an adsense leaderboard. This has been used for a while but came out in a digital point forum thread where a member talked about quadrupling their CTR. Basically you set up the adsense code in a table with four images that line up directly with the ads. Whether or not this is deceptive is fuzzy and very subjective. Obviously four blinking arrows would be ‘enticing people to click’ and be against the adsense TOS. However placing pictures of 4 laptops over laptops ads isn’t, so use your best judgment here and look at it from the advertiser or Google’s perspective. If you have a question as to your implementation being ‘over the line’ write to adsense and ask them to take a look.

As far as using the images, I’ve done it and can tell you it definitely works. You get the best results when the images ‘complete the story the ads are telling’. For example if you have ads about apple pies, use pictures of freshly baked apple pies, instead of granny smith, Macintosh, pink lady, and braeburn apples.TIP: Don’t limit yourself to using images only on that size ad unit, it works just as well with the other sizes, like the 336 rectangle.

Added:
I got a little criticizm for this and rightly so, as I wasn’t specific as I could have been. Do not use very identifiable brand name or products for your images. Use generic non-specific stock images whenever possible and appropriate.

Multiple Ad Units

Another way to increase ad revenue is to use multiple ad units. According to Google’s TOS you are allowed to post up to three ad units per page. Similar to standard search results the highest paying ad units will be served first and the lowest being served last. If there is enough of an ad inventory, place all three ad units. However you should pay attention to the payouts. Current assumption is you get 60% of the revenue (on a $0.05 click you get $0.03). So if a click from the third ad unit is only paying between 3 to 5 cents you may want to omit it from your page. This is one are where giving your ad units channels does have value. If one ad unit is getting a higher percentage of click throughs you’ll want to make sure the highest paying ads are being served there. TIP:Use CSS positioning to get your highest paying ads serving in the location with the highest CTR.

Adsense in RSS

With the growth of blogs and RSS feeds you’re starting to see adsense included in the feeds now. IMHO this doesn’t work, and here’s why:

  • You only get to place one ad unit.
  • You have no control over finding the ’sweet spot’ for the ad unit.
  • The ads are usually poorly targeted (this is getting better).
  • People develop ‘banner blindness’.

I know people like being able to read full postings in their feed reader, and there are at least a dozen other reasons for full posts from pleasing your users to mobile offline computing, all of which are completely valid. However if your website depends on generating adsense revenue to survive, then bring them to the site and show them the ads there.

Affiliate Sites

Placing Adsense on affiliate sites is tricky. Are you giving up a $10, $20, or $30 sale for a $1 click? This is something you have to test on your own to figure out. If you aren’t converting now it’s definitely worth a try. I like to use adsense on my article pages. For example let’s say you had an affiliate website where you sold shoes. You’re going to need some related articles to ‘flesh out’ the site. Things like ‘getting a shoe shine’ or ‘finding a shoe repair shop’ these are excellent spots for adsense. While you won’t get rich, they will usually provide a small steady income and cover things like hosting costs.TIP: If you find you have pages getting more than 50 clicks per month add more pages about this topic, and link the pages together. Mine you logs for the search terms used.

PPC Arbitrage

This is a dicey subject so I’m going to steer clear of precise examples. Basically you bid on low volume uber niche terms at a very low cost. You set up landing page that contains high payout ads for the related general topic. You are looking for terms with a large gap between the price you are bidding on adwords and the price you are getting on Adsense. If you pay $0.10 a click and get $1.00 a click you make $0.90 each click. To get your adsense ad approved you will need to ‘add some value’ along the way. You can make a killing or get taken to the cleaners with this one, so make sure you know what you are doing before you try it.

Have any other adsense tips, tricks or secrets? Drop me an email and let me know, I’ll give you credit.

Added
728 leaderboard works very well if it is just above the end of the
“above the fold” area on what would be considered your viewers average
resolution/browser window size if there are few other enticing links
above the fold. Makes for an interesting layout but if you’re building
a site for AdSense it may be worth it. We consistently receive very
high CTRs from doing this.

Try to build sites that allow you to quickly try any and all of
those locations outlined in the heatmap guide or at least allow you a
wide degree of freedom to easily change ad/content locations.
via:nuevojefe

0 comments:

What they says

Copyright © 2013 Techsense. WP Theme-junkie converted by BloggerTheme9
Blogger template. Proudly Powered by Blogger.| Distributed by Rocking Templates
back to top